| Trouble viewing this Wolfsburg West Newsletter? View Online Here |
 |
November, 2000 Hello and welcome to WolfsburgWired, the monthly online newsletter of information for customers and friends of Wolfsburg West. |
|||
|
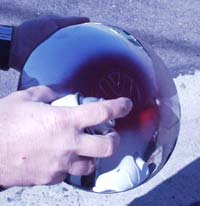
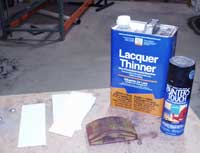
Hubcap logo painting secret The thought of painting the VW portion of a hubcap sounds pretty easy. Just mask the area that you don't want painted, whip out a small hobby paint brush and VOILA!! So, you go about the chore of cutting masking tape to size, painstakingly applying the tape onto the hubcap and paint each portion of the VW logo. As you remove the masking tape, you notice a few thousand brush strokes have left their crude rigid impression, and a few areas of bleed-through are present where the paint seeped through the masking tape. It is at this point of the project that your hubcap is hurled through the air as if it was a chrome plated Frisbee, which then bounces off a wall and dents your fender. After experiencing a situation which resembled the above scenario, Larry Dustman, owner of The Trim Shop in Chandler, Arizona, enlightened me with his secret of achieving a perfectly painted hubcap VW logo. The procedure is quite simple, and requires very little in terms of skill and or expertise. Tools/supplies
required: |
|||
| 1.
Prepare a sanding block or block of wood by attaching a thin
lint free fabric to the sanding surface. This sanding block
surface will be the tool used to remove the excess paint on
the hubcap. 2. This process is best performed on chrome hubcaps. Painted caps tend to loose the crispness of the logo making it nearly impossible to achieve a smooth edge. 3. Using typical "run of the mill" spray paint, spray the emblem with one good heavy coat. This is one of those instances where two thin coats is not better than one heavy coat. |
|
||
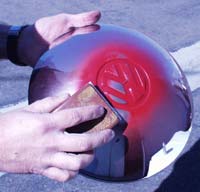
| 4.
Immediately after spraying the cap and with the paint still
very wet, rub your sanding block with the fabric attached
over the logo surface of the hubcap. Dont worry about removing
all of the paint but concentrate on making the edges as clean
as possible. If the paint starts to get to tacky, apply a
LITTLE lacquer thinner or suitable solvent to the surface
of the lint free fabric. With the majority of the paint removed,
let the paint dry hard before proceeding to the next step. 5. There are several ways to remove the balance of the paint left on the cap. Polishing compound and/or polishing wax is a good start. If the leftover paint is somewhat large, apply a small amount of lacquer thinner or suitable solvent onto a towel and rub gently. |
 |
||
 |
|||
|
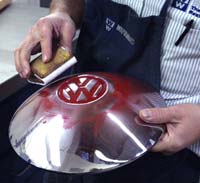
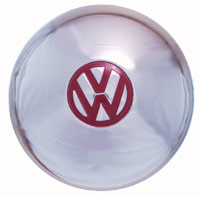
6.
Dont loose any sleep if you make a mistake. Your work can
easily be erased with lacquer thinner. Our finished hubcap. Total time from start to finish approximately 10 minutes. |
 |
||

|
|||
 |
|||
VISIT OUR WEB SITE |
|||